YOLOv7 Object Detection Deployment on AWS
Project Overview
This project consists of deploying a pre-trained YOLOv7 object detection model to the cloud using AWS Elastic Beanstalk. The application allows users to upload an image and receive a JSON response containing the detected objects along with their confidence scores. The objective was to build a full end-to-end pipeline from model conversion to production deployment, making the solution scalable and accessible via a REST API. This includes converting the YOLOv7 model from PyTorch to ONNX, validating its performance, and comparing its predictions to ensure consistency. A key component of the project is transfer learning, leveraging the robustness and accuracy of YOLOv7—a state-of-the-art object detection model—to avoid training a model from scratch and focus on integrating it into a production environment.
Technologies Used
The following technologies were used to develop this project:
- Backend: Python, Flask
- Model Inference: ONNX Runtime
- Frontend: HTML, CSS, JavaScript, Bootstrap
- Testing: Pytest (unit tests), Selenium (automation), Insomnia (API testing)
- CI/CD: GitHub Actions
- Cloud Infrastructure: AWS S3 (for model storage), AWS Elastic Beanstalk (for deployment)
Converting the YOLOv7 Model from PyTorch to ONNX
To prepare the YOLOv7 model for deployment in a cloud environment, the first step was converting it from its original PyTorch format to the ONNX
(Open Neural Network Exchange) format.
This step was crucial for optimizing the model for production and ensuring efficient inference.
Why Convert to ONNX?
When deploying machine learning models to production—especially on resource-constrained environments such as cloud-based APIs—it's important to minimize memory usage and latency. ONNX offers several advantages that made it ideal for this project:
- Lightweight Runtime: Unlike PyTorch, which requires a larger runtime and dependencies, ONNX models can be run using the lightweight onnxruntime, reducing memory footprint and speeding up container startup time.
- Improved Inference Speed: ONNX can offer faster inference times, which is critical for real-time object detection tasks.
- Framework Interoperability: ONNX acts as a bridge between frameworks, allowing models trained in PyTorch to be deployed in systems originally built for TensorFlow, Caffe2, or other platforms.
- Production Readiness: By converting the model to ONNX, we facilitate integration with various production pipelines, making deployment and maintenance more consistent and scalable.
Implementation Details
The conversion process was done using Google Colab for its GPU support and flexibility. After converting the model, it was tested and compared against the original PyTorch version to ensure that inference results remained consistent.
Credits: The original conversion script was adapted from a version shared by Wong Kin Yiu, the author of YOLOv7. The code was modified to fit the specific needs of this deployment pipeline.
The following code snippet shows the steps taken to convert the YOLOv7 model to ONNX format.
Step 1: Install Required Dependencies
First, we install the necessary libraries to work with ONNX and PyTorch. This includes onnx, onnxruntime, and onnx-simplifier, among others. We also ensure compatibility with the required versions of protobuf.
!pip install --upgrade setuptools pip --user
!pip install onnx
!pip install onnxruntime
#!pip install --ignore-installed PyYAML
#!pip install Pillow

!pip install protobuf<4.21.3
!pip install onnxruntime-gpu
!pip install onnx>=1.9.0
!pip install onnx-simplifier>=0.3.6 --user
Step 2: Clone the YOLOv7 Repository
We then clone the official YOLOv7 repository by Wong Kin Yiu, which provides the training weights and export scripts required for model conversion.
!git clone https://github.com/WongKinYiu/yolov7
%cd yolov7
!ls
Step 3: Download Pre-trained Weights
Download the pre-trained weights used for object detection. These weights were trained on a standard dataset and will later be used for inference and export
!wget https://github.com/WongKinYiu/yolov7/releases/download/v0.1/yolov7_training.ptStep 4: Run a Sample Inference (Optional Test)
Before exporting the model, it's helpful to validate that the model works as expected in PyTorch by running inference on a sample image.
!python detect.py --weights yolov7_training.pt --source ./inference/images/bus.jpg
from PIL import Image

Image.open('/content/yolov7/yolov7/runs/detect/exp3/bus.jpg')
Step 5: Install Graph Surgeon (Optional for Advanced Optimization)
For graph manipulation and optimization before conversion, onnx_graphsurgeon is installed from NVIDIA’s NGC registry.
!pip install onnx_graphsurgeon --index-url https://pypi.ngc.nvidia.com
Step 6: Export Model to ONNX Format
Finally, we convert the PyTorch model to ONNX using the provided export.py script, applying simplifications and configurations optimal for inference on AWS:
%cd /content/yolov7/yolov7/
!python export.py --weights ./yolov7_training.pt \
        --grid --end2end --simplify \
        --topk-all 100 --iou-thres 0.45 --conf-thres 0.25 \
        --img-size 640 640 --max-wh 640
This produces a .onnx model file, which is validated and later uploaded to AWS S3, ready to be consumed by the Flask-based inference API.
Validating the ONNX Model with Inference
After converting the model to ONNX format, we performed a manual inference to validate its functionality and ensure the outputs were coherent with the original PyTorch model. Using onnxruntime, we loaded the exported .onnx model and ran inference on the same image used in the PyTorch test. The image was preprocessed following YOLOv7's input requirements: resized and padded with the letterbox function, normalized, and converted to the appropriate format expected by the ONNX runtime
import cv2
import time
import requests
import random
import numpy as np
import onnxruntime as ort
from PIL import Image
from pathlib import Path
from collections import OrderedDict,namedtuple

## CONFIGURACION
cuda = False
w = "/content/yolov7/yolov7/yolov7_training.onnx"
# img = cv2.imread('/content/yolov7/yolov7/runs/detect/exp2/bus.jpg')
img_path = Path('/content/yolov7/yolov7/runs/detect/exp3/bus.jpg').as_posix()
img = cv2.imread(img_path)
names = ['person', 'bicycle', 'car', 'motorcycle', 'airplane', 'bus', 'train', 'truck', 'boat', 'traffic light',
         'fire hydrant', 'stop sign', 'parking meter', 'bench', 'bird', 'cat', 'dog', 'horse', 'sheep', 'cow',
         'elephant', 'bear', 'zebra', 'giraffe', 'backpack', 'umbrella', 'handbag', 'tie', 'suitcase', 'frisbee',
         'skis', 'snowboard', 'sports ball', 'kite', 'baseball bat', 'baseball glove', 'skateboard', 'surfboard',
         'tennis racket', 'bottle', 'wine glass', 'cup', 'fork', 'knife', 'spoon', 'bowl', 'banana', 'apple',
         'sandwich', 'orange', 'broccoli', 'carrot', 'hot dog', 'pizza', 'donut', 'cake', 'chair', 'couch',
         'potted plant', 'bed', 'dining table', 'toilet', 'tv', 'laptop', 'mouse', 'remote', 'keyboard', 'cell phone',
         'microwave', 'oven', 'toaster', 'sink', 'refrigerator', 'book', 'clock', 'vase', 'scissors', 'teddy bear',
         'hair drier', 'toothbrush']
providers = ['CUDAExecutionProvider', 'CPUExecutionProvider'] if cuda else ['CPUExecutionProvider']
session = ort.InferenceSession(w, providers=providers)

def letterbox(im, new_shape=(640, 640), color=(114, 114, 114), auto=True, scaleup=True, stride=32):
    # Resize and pad image while meeting stride-multiple constraints
    shape = im.shape[:2]  # current shape [height, width]
    if isinstance(new_shape, int):
        new_shape = (new_shape, new_shape)

    # Scale ratio (new / old)
    r = min(new_shape[0] / shape[0], new_shape[1] / shape[1])
    if not scaleup:  # only scale down, do not scale up (for better val mAP)
        r = min(r, 1.0)

    # Compute padding
    new_unpad = int(round(shape[1] * r)), int(round(shape[0] * r))
    dw, dh = new_shape[1] - new_unpad[0], new_shape[0] - new_unpad[1]  # wh padding

    if auto:  # minimum rectangle
        dw, dh = np.mod(dw, stride), np.mod(dh, stride)  # wh padding

    dw /= 2  # divide padding into 2 sides
    dh /= 2

    if shape[::-1] != new_unpad:  # resize
        im = cv2.resize(im, new_unpad, interpolation=cv2.INTER_LINEAR)
    top, bottom = int(round(dh - 0.1)), int(round(dh + 0.1))
    left, right = int(round(dw - 0.1)), int(round(dw + 0.1))
    im = cv2.copyMakeBorder(im, top, bottom, left, right, cv2.BORDER_CONSTANT, value=color)  # add border
    return im, r, (dw, dh)

## Pre-processing
colors = {name:[random.randint(0, 255) for _ in range(3)] for i,name in enumerate(names)}
img = cv2.cvtColor(img, cv2.COLOR_BGR2RGB)
image = img.copy()
image, ratio, dwdh = letterbox(image, auto=False)
image = image.transpose((2, 0, 1))
image = np.expand_dims(image, 0)
image = np.ascontiguousarray(image)
im = image.astype(np.float32)
im /= 255
im.shape
outname = [i.name for i in session.get_outputs()]
inname = [i.name for i in session.get_inputs()]
inp = {inname[0]:im}

# ONNX inference
outputs = session.run(outname, inp)[0]
outputs
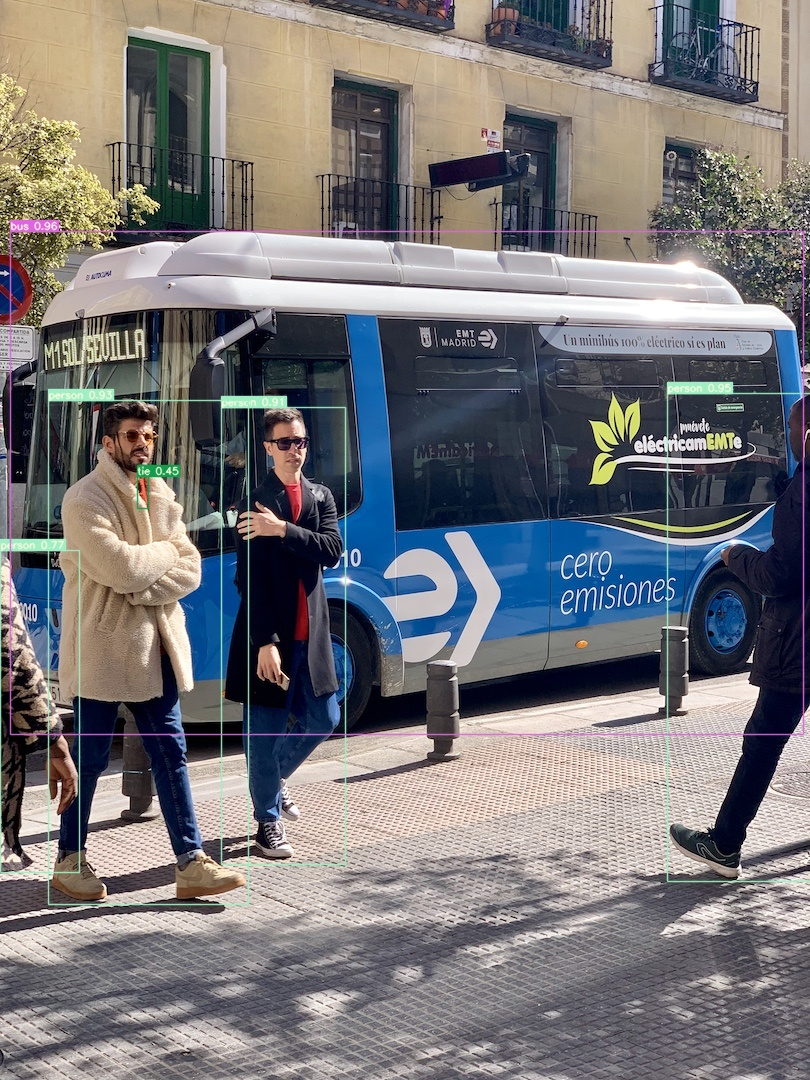
Visual Comparison: PyTorch vs ONNX Output
To verify that the ONNX model performs equivalently to its PyTorch counterpart, we rendered the outputs from both inference pipelines on the same input image and compared the results visually. The following post-processing steps were applied to the ONNX outputs:
- Bounding box coordinates were rescaled to match the original image dimensions.
- Each detection was drawn on the image using a class-specific color.
- Labels were annotated with the class name and confidence score.
ori_images = [img.copy()]

for i,(batch_id,x0,y0,x1,y1,cls_id,score) in enumerate(outputs):
    image = ori_images[int(batch_id)]
    box = np.array([x0,y0,x1,y1])
    box -= np.array(dwdh*2)
    box /= ratio
    box = box.round().astype(np.int32).tolist()
    cls_id = int(cls_id)
    score = round(float(score),3)
    name = names[cls_id]
    color = colors[name]
    name += ' '+str(score)
    cv2.rectangle(image,box[:2],box[2:],color,2)
    cv2.putText(image,name,(box[0], box[1] - 2),cv2.FONT_HERSHEY_SIMPLEX,0.75,[225, 255, 255],thickness=2)

imgpytorch = Image.open('/content/yolov7/yolov7/runs/detect/exp3/bus.jpg')
# /content/yolov7/yolov7/runs/detect/exp3/bus.jpg
imgonnx = Image.fromarray(ori_images[0])
plt.figure(figsize=(14,10))
plt.subplot(121)
plt.imshow(imgpytorch)
plt.subplot(122)
plt.imshow(imgonnx)
plt.show()

Both results show consistent object detection performance, identifying the same instances (people and a bus) with similar bounding boxes and confidence scores. This visual parity confirms that the ONNX model maintains the predictive integrity of the original PyTorch version, validating the success of the model conversion process.
Project Directory Setup
To ensure a maintainable and production-ready application, the project was structured following best practices for Python web development and model deployment. This step involved creating a clear directory layout, setting up a virtual environment, and specifying the project dependencies in a requirements.txt file.
Project Structure
Below is an overview of the main directory structure used in the project:
AWS-Project/
│
├── app/                    # Core application logic
│   ├── application.py      # Initializes and configures the Flask app
│   ├── yolocounterv1.py    # Handles object counting logic
│   ├── yolomodel.py        # Loads and runs ONNX model inference
│   ├── static/             # CSS and JS
│   └── templates/          # HTML template (Flask view)
│
├── tests/                  # Automated tests
│   ├── conftest.py
│   ├── pytest.ini
│   ├── run_tests.py
│   ├── test_app.py         # Unit tests for Flask endpoints
│   ├── test_integration.py # Integration tests
│   └── test_ui.py          # Selenium UI tests
│
├── .github/                # GitHub Actions workflows for CI
├── .ebextensions/          # Elastic Beanstalk config files
├── .platform/              # Platform-specific settings
├── .env                    # Environment variables
├── .gitignore              # Git exclusions
├── venv/                   # Python virtual environment
├── app.py                  # Entry point to run the application locally
├── yolov7_training.onnx    # Converted ONNX model
└── requirements.txt        # List of dependencies
Entry Point: app.py
The app.py file in the root directory serves as the main entry point for local development and testing. It simply imports and runs the Flask app defined in app/application.py:
from app.application import application

if __name__ == '__main__':
    application.run(debug=True)
Virtual Environment
To manage dependencies in isolation and avoid conflicts, a Python virtual environment (venv/) was created. This ensures reproducibility across environments and avoids polluting the system Python installation.
python -m venv venv
source venv/bin/activate  # On Windows: venv\Scripts\activate
Requirements File
All required packages were listed in the requirements.txt file to make the environment easily reproducible, especially for cloud deployment:
onnxruntime==1.16.2
opencv_python==4.8.1.78
Pillow==10.0.1
requests==2.31.0
flask==3.0.0
numpy==1.26.2
python-dotenv
selenium
pytest
pytest-flask
webdriver-manager
pytest-cov
psutil
pillow
Dependencies include:
- Flask: for building the REST API.
- ONNX Runtime, OpenCV, and NumPy: for model inference and image handling.
- Selenium and Pytest: for automated testing.
- Python-Dotenv: for loading environment variables securely.
- psutil: for monitoring resources in some test cases or performance tuning.
Running the Application Locally
To run the application locally, start by activating your virtual environment and executing the command:
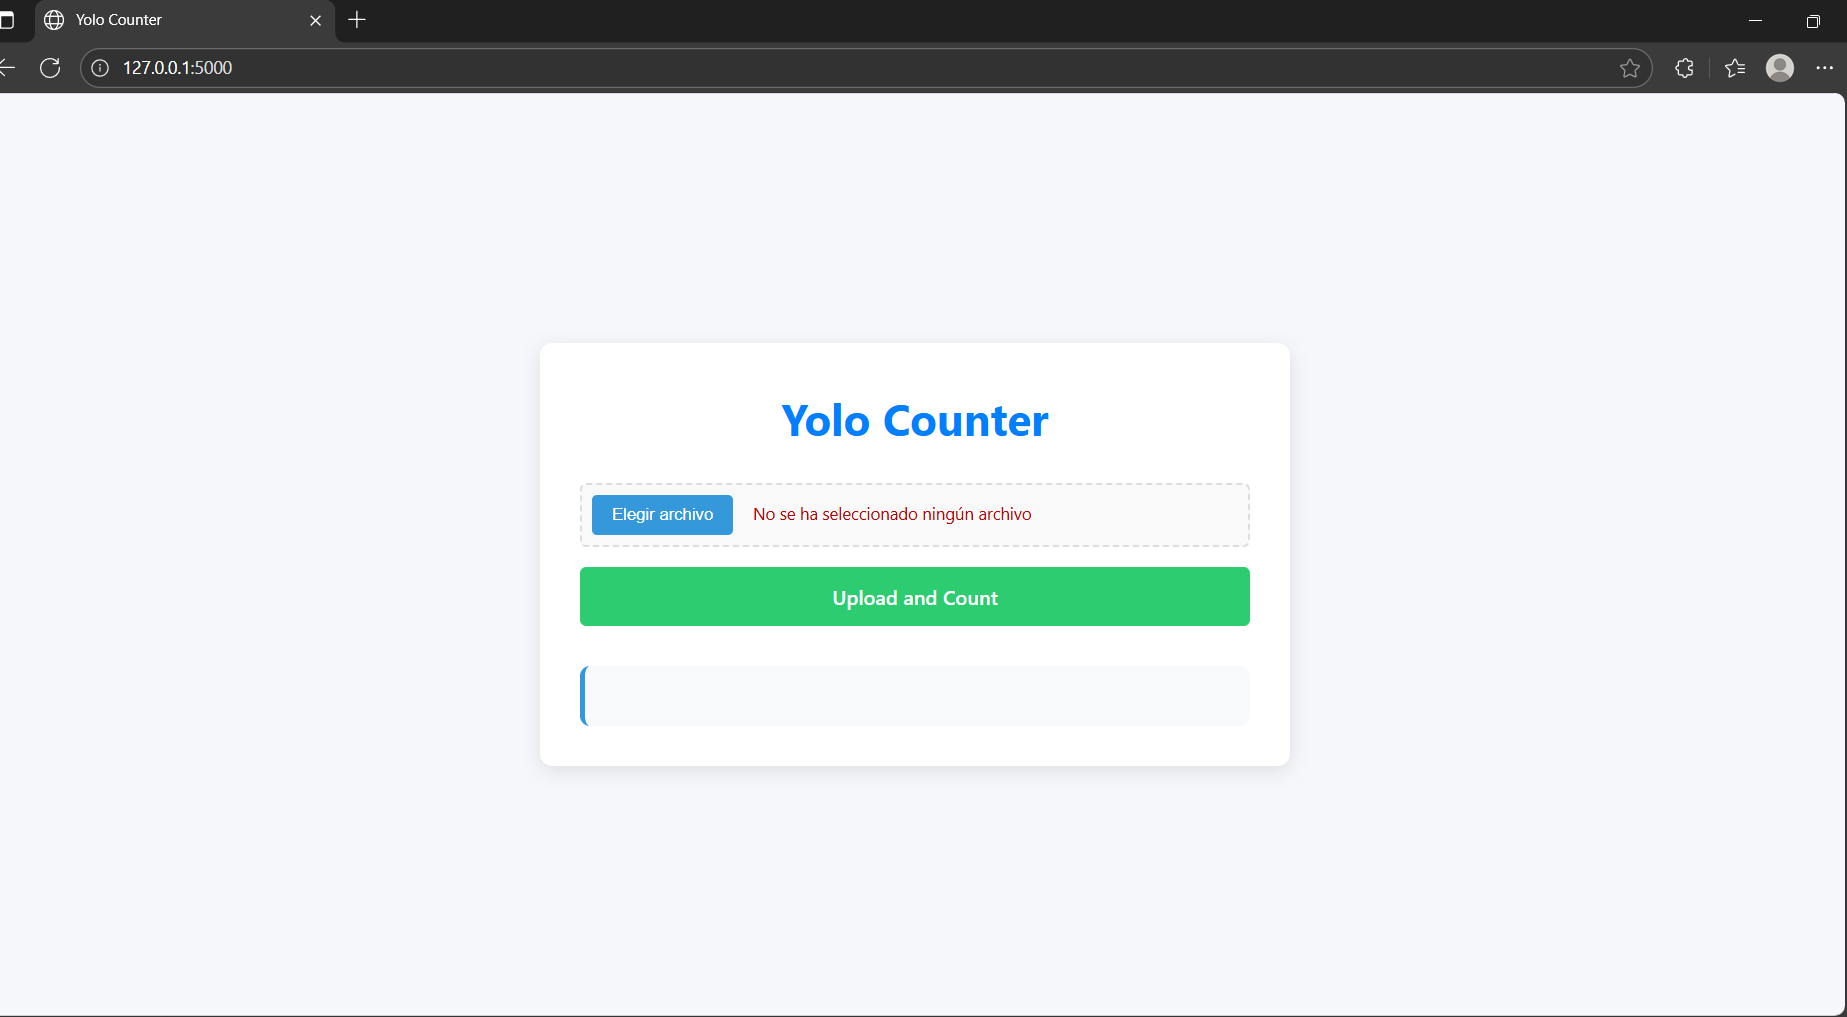
python application.py. Once running, you can open your browser and navigate to the local host URL (usually http://127.0.0.1:5000) shown in the console.
The web interface will appear, allowing you to interact with the deployed model.
Local Testing
Before deploying the application to production, it is essential to verify that all components behave correctly in a controlled environment. This project uses three primary tools for testing:
Insomnia – Manual API Testing
Insomnia was used to manually verify the behavior of the /detect route during development. By sending a POST request with an image file, the API returns two structured outputs:
- countings: A summary of object types and their respective counts.
- detections: A list of individual detections, each with:
- class: The detected object's class name.
- confidence: The detection's confidence score (as string).
- bounding_box: The coordinates [x1, y1, x2, y2] of the bounding box around the detected object.
- Verifying response schema and keys.
- Confirming accurate detection of object types like car, person, truck, bus, etc.
- Manually inspecting confidence scores for quality control.
- Validating YOLO inference post-conversion to ONNX.
Here the image is sent to the API, and the response is displayed in JSON format:

Sample response from the API:
{
  "countings": {
    "backpack": 2,
    "bus": 1,
    "car": 11,
    "motorcycle": 1,
    "person": 4,
    "truck": 2
  },
  "detections": [
    [[379, 248, 959, 632], 2, "0.9502241", "car"],
    [[133, 176, 293, 520], 0, "0.9456609", "person"],
    [[0, 290, 255, 631], 2, "0.9187772", "car"],
    ...
    [[271, 107, 454, 276], 5, "0.2698659", "bus"]
  ]
}
Use Cases Covered:
Pytest – Unit and Integration Testing
Pytest is a widely-used Python testing framework. It was used in this project to validate:
- Application logic (e.g., routing, image handling).
- Response structure and content.
- Edge cases (e.g., invalid input, missing data).
- Performance metrics (e.g., response time).
- Multiple image formats and sizes.
Total results from running the tests:
============================= test session starts =============================
platform win32 -- Python 3.11.4, pytest-8.4.1
rootdir: /tests
collected 26 items

tests/test_app.py .....................                                  [ 80%]
tests/test_integration.py ...                                            [ 92%]
tests/test_ui.py ..                                                      [100%]

============================= 26 passed in 46.70s =============================

✅ All tests passed successfully.
Example test cases passed:
- Accessing index and detect routes.
- Validating response types and content structure.
- Testing invalid/missing files.
- Simulating YOLO inference edge cases.
- Evaluating multiple image formats (JPEG, PNG, BMP).
- Measuring response time for performance assurance.
GitHub Actions – Continuous Integration
GitHub Actions plays a crucial role in automating the testing and validation process of our project. By integrating CI (Continuous Integration), we ensure that every new commit or pull request to the main branch is automatically verified through linting and testing. This helps catch errors early, enforce code quality, and maintain consistent behavior across environments.
Common Workflow Structure
GitHub Actions uses workflow files written in .yml format, typically located in the .github/workflows/ directory of the repository. In our project, we use a file named python-app.yml, which triggers the workflow on:
- Every push to the main branch
- Every pull request targeting the main branch
Workflow Breakdown
Here's what the CI pipeline step by step:
name: Python application
on:
  push:
    branches: [ "main" ]
  pull_request:
    branches: [ "main" ]

permissions:
  contents: read
- The workflow is named "Python application".
- It is triggered by pushes and pull requests to the main branch.
- The build job runs in a clean Ubuntu environment, ensuring consistency across builds.
- Checks out the repository so the workflow can access the project files.
- Sets up Python 3.11, the version used in development.
- Installs project dependencies, including flake8 for linting and pytest for testing.
- Runs static code analysis with flake8, checking for syntax errors and code complexity.
- The second line (exit-zero) ensures that non-critical issues don't break the build.
- Sets an environment variable needed for the application to fetch the ONNX model from S3
jobs:
  build:
    runs-on: ubuntu-latest
steps:
- uses: actions/checkout@v4
- name: Set up Python 3.11
uses: actions/setup-python@v3
with:
    python-version: "3.11"
- name: Install dependencies
  run: |
    python -m pip install --upgrade pip
    pip install flake8 pytest
    if [ -f requirements.txt ]; then pip install -r requirements.txt; fi
- name: Lint with flake8
  run: |
    flake8 . --count --select=E9,F63,F7,F82 --show-source --statistics
    flake8 . --count --exit-zero --max-complexity=10 --max-line-length=127 --statistics
- name: Set environment variables
  run: |
    echo "S3_BUCKET_URL=https://modelv0.s3.us-east-1.amazonaws.com/" >> $GITHUB_ENV
- name: Test with pytest
  run: |
    pytest
- Automated assurance: Every code change is validated without manual intervention.
- Prevent regressions: Failures in tests or syntax immediately alert contributors.
- Consistency: The CI environment mimics production conditions.
- Scalability: New tests and checks can be added seamlessly.
Deployment to AWS
The application was deployed using AWS Elastic Beanstalk, a service that simplifies the process of deploying and scaling web applications. Since this process involves several specific configuration steps —such as setting up the environment, assigning service roles, and selecting the appropriate instance type— a dedicated presentation was created to explain each step visually and clearly.
In general terms, the deployment consists of compressing the application into a .zip file that includes the key files:
application.pyrequirements.txtapp/directory.ebextensions/directory.platform/directory
The following video shows a demonstration of the application running successfully on the AWS cloud.
You can explore the complete source code on GitHub .